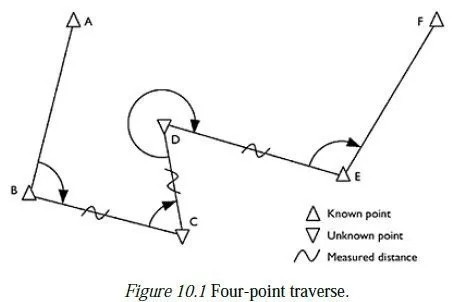
Horizontal angles
Take at least one full round of observations, i.e. CL/SR and CR/SL see Figure 4.3. In the circle-left position, set the horizontal circle reading initially to a random value, not to any specific reading.9 Swinging from left to right, sight on the first point to be observed, which will be called the RO (reference object). Swinging right throughout, take readings for all the points to be observed from the station. Always close the round by re-observing the RO; the difference in readings is called the closing error. A standard for acceptable closing errors will depend on the instrument in use and on the quality of the work 8 Note that this is not the same as the booker repeating what they have just heard! 9 On the first (or only) round of readings, the arithmetic is simplified if the horizontal circle is adjusted such that the angle observed for the reference object is just over 0°. required a typical value might be 5 seconds.10 If there is an unacceptable closing error, all the readings should be discarded and a fresh start made.
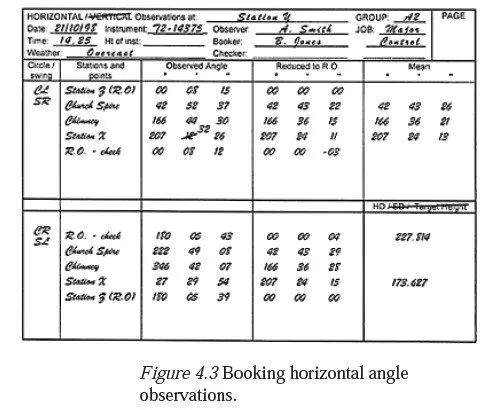
Change face by transitting the telescope and swinging through 180°. Slightly change the position of the horizontal circle to guard against repeated misreading of the scales and unconscious memories of previous readings. Swinging now from right to left, sight again on the RO and observe the horizontal circle. Swinging left throughout, take the readings for all the points to be observed from the station, in the order of reaching them i.e. the opposite order from the circle-left readings. Close the round again as before. When booking, it is always best to write the points for SL in the same order as for SR and to book from the bottom of the form upwards on SL. After the first half round, and throughout a repeated round, the booker is in a position to know in advance what the next reading should be and should ask the observer to check if there is an unacceptable discrepancy. When a round of horizontal angle observations has been completed, the booker should enter the mean of the reduced circle-left and circle-right angles in the top part of the right-hand column. The bottom part of the same column can be used to record any horizontal or slope distances which are observed.
Vertical angles
Always take sets of observations on both CL and CR (see Figure 4.4). There is no virtue in swinging left or right, and there is no RO to close on. The horizontal hair may not be quite horizontal, so intersect always with the same part of it, just to one side of the vertical hair remember that the left-hand side of the reticle on CL becomes the righthand side on CR.
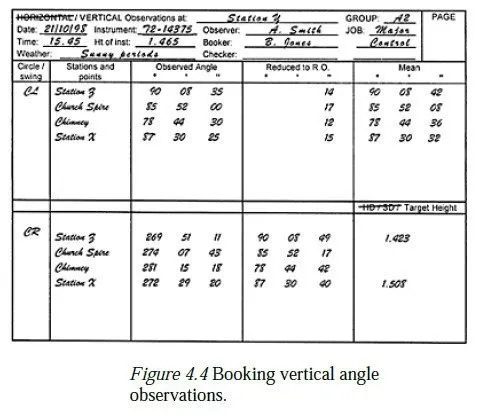
The booker records the height of the instruments trunnion axis above the station mark. Note that, without this measurement, the angle observations will be useless!If a target on a tripod is being observed, the height of the target above the station will also be needed and can be recorded in the lower part of the right-hand column. If some other object is being observed (e.g. a lightning conductor), the observer makes a sketch in the observation book, indicating by an arrow the exact point intersected on the object. Assuming that the instrument measures zenith angles, the horizontal will appear as 90° on CL and 270° on CR. The booker should record next to the CR readings the value obtained by subtracting the reading from 360°. The differences between these and the CL observations can be booked next to the CL readings and should remain nearly constant; the constant is zero only if the zero adjustment on the vertical circle is perfect. If any difference varies significantly from the norm, the booker should demand a check.
Finally, the top part of the right-hand column should be used to record the accepted vertical angle for each observation, namely the average of CL and 360° CR. This cancels out any maladjustment of the vertical circle. The bottom part of the column can be used to record any slope distances which have been measured and/or the heights of observed targets above their stations. Always centre the alidade bubble before taking each reading of the vertical circle.
Setting out angles
As mentioned in Chapter 3, it is sometimes necessary to set up a theodolite to sight in a predetermined direction, rather than simply to record the direction it is sighted in when observing a target. Usually the starting point is a known horizontal angle which must be swung through, once a reference object has been observed. With an electronic theodolite, the process is then simple. Sight on the reference object with the instrument in position I and set the horizontal angle to zero. Then swing the instrument to approximately the right direction, clamp it and turn the horizontal tangent screw until the required horizontal angle is displayed. Markers can then be set up at any point along the line of sight. The reference object is then sighted again, to ensure that no setting has been disturbed. For accurate work, this process is then repeated with the instrument in position II, and an average of the two sight lines is used. With a conventional theodolite, a booking sheet is partially filled before going out into the field, with the station name and all columns except Observed Angle and Mean filled in from the known data. Once out in the field, the reference object is observed in CL, and the angle recorded in the usual way. The reduced angle of the required direction is then added to this reading and written down in the Observed Angle column. The observer is told to swing the instrument to this angle, and does so by first setting the optical vernier to read the appropriate number of minutes and seconds, then swinging the instrument and using the horizontal tangent screw until the entire correct reading is shown in the display.11 As with the electronic instrument, the reference object is then reobserved (and booked), and the process repeated in CR. See Appendix F for a worked example in calculating an angle for setting out, including the preparation of a booking sheet.